The topic Copilot Chat: Your hub for document creation and analysis is currently the subject of lively discussion — readers and analysts are keeping a close eye on developments.
This is taking place in a dynamic environment: companies’ decisions and competitors’ reactions can quickly change the picture.
Many years ago, Microsoft created a handy hub for its Office suite: type office.com into your browser, and you’d see a web page where you could launch the various Office apps — Word, Excel, PowerPoint, and so on — or access recently used documents in those apps. This hub’s appearance changed a bit over time as the Office suite was rebranded as Office 365 and then Microsoft 365, but it still served as a launch pad for your M365 files and apps.
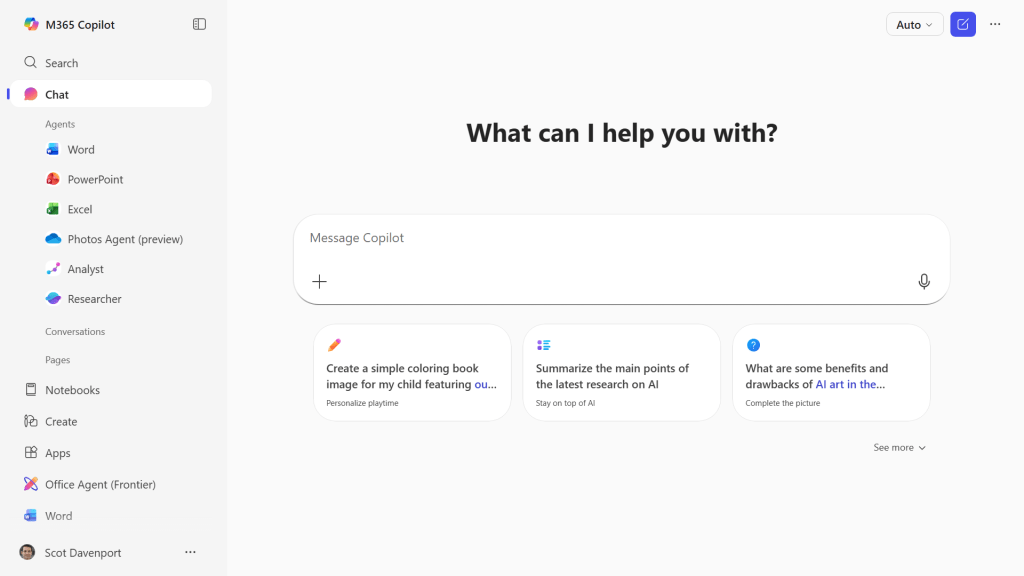
Now, however, Microsoft has deeply integrated its Copilot generative AI assistant throughout Microsoft 365, and the hub has been transformed. Currently called the M365 Copilot app, the page puts the Copilot Chat interface front and center. You can still get to your M365 files or apps by clicking Search or Apps in the sidebar on the left, but the main purpose of the hub these days is to let you chat with Copilot.
The old Microsoft Office hub has been taken over by Copilot Chat.
With the rollout of new Word, Excel, and PowerPoint AI agents, you can use Copilot Chat in the M365 Copilot app to generate first-draft Word documents, Excel spreadsheets, and PowerPoint presentations. If you have a qualifying Microsoft subscription, you can also use the advanced Analyst agent in Copilot Chat to analyze M365 files in various ways. We’ll show you how.
As of mid-2026, Microsoft has integrated Copilot Chat into most M365 plans, which include:
Microsoft recently removed access to Copilot Chat from within Word and other M365 apps for large enterprise users who don’t have an add-on M365 Copilot license. That means the M365 Copilot app is now the only way for those users to access Copilot Chat.
If you don’t have a Microsoft 365 plan, you don’t have access to Copilot Chat. You can still use the M365 Copilot app to get to your Office files and apps, but if you click New chat, you’ll see a message saying that Copilot Chat requires an upgraded account.
In this guide, we’ll focus on using Copilot Chat in the M365 Copilot web app. There are also downloadable M365 Copilot apps for Windows, macOS, iOS, and Android. Depending on your M365 plan and computing environment, your interface may not exactly match the screenshots you see here, but it should work similarly.
Using the M365 agents in Copilot Chat works mostly the same whether you’re creating a new Word document, Excel spreadsheet, or PowerPoint presentation.
Depending on your Microsoft 365 plan and how it’s configured, you may or may not have the Word, Excel, and PowerPoint AI agents installed by default in Copilot Chat. If you don’t see them listed under “Agents” in the left sidebar, you’ll need to add them.
Click All agents in the left sidebar. You’ll be taken to the Agent Store, where you can browse through available agents built by Microsoft, third-party vendors, and/or your own organization. Type word into the search bar and select the Word (Agent) result that appears. A panel pops up with information about the agent.
Click Add to install the agent in Copilot Chat. It will appear in your Agents list in the left sidebar. Repeat the process for the Excel and PowerPoint agents.
On the Copilot Chat page, you first need to invoke a specific AI agent: In the left sidebar, select Word, PowerPoint, or Excel from the Agents list. (If you don’t see the agent you want, select All agents and then click on it.)
Alternatively, inside the Copilot chat box, type @ and select Word (or whichever agent you want) from the results that appear below the chat box.
Enter your prompt in the chat box, describing the details about the document, spreadsheet, or presentation that you want.

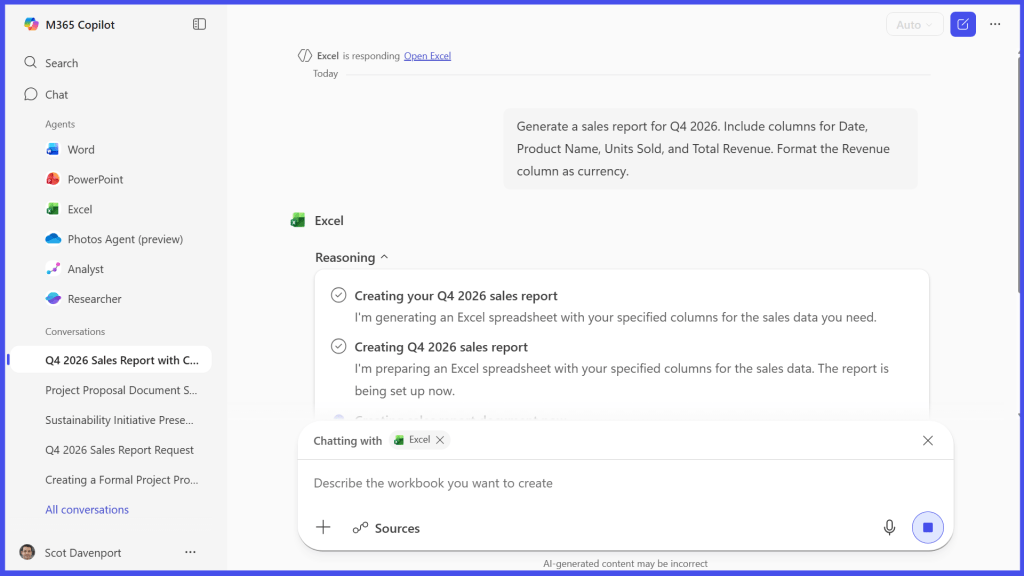
To generate an Excel spreadsheet, describe its structure. Example:
To generate a PowerPoint presentation, specify important aspects of the presentation, such as its topic, audience, number of slides, etc. Example:
You can attach one or more files to the chat box for Copilot to use as reference when generating your request. for example, you can attach a Word document and prompt the PowerPoint agent to create a presentation based on it:
or have the Word agent create a document based on an Excel spreadsheet:
To attach a file, click the + icon on the chat box and select Add content (to attach a file in your OneDrive) or Upload files (to attach a file that’s on your local PC drive).
Alternatively, if the file is stored in your OneDrive, you can type / (forward slash) in the chat box and start typing its filename. This also pulls up a list of files recently added to your OneDrive that you can select from, and there’s also a search box you can use to find the file.
Adding a document to use as a source for a PowerPoint agent prompt.
When you’ve finished typing your prompt and optionally uploading a source file, press Enter or click the right-arrow button at the bottom right of the chat box.
The agent may ask you a few questions, mostly presented as options you select, before generating a result.
The PowerPoint agent typically asks a few questions about the presentation before it starts creating it.
Depending on the complexity of your prompt, Copilot will take several seconds to several minutes to generate a result. As it works, it will notify you of its progress.
Copilot will tell you what it’s doing as it prepares a result.
When it’s done, it will automatically save the document, spreadsheet, or presentation that it generated to the Documents folder in your OneDrive.
A large pane will also open in the right half of the screen, displaying the full document, spreadsheet, or presentation that Copilot generated. You can scroll vertically through it to review it.
important: As always when using generative AI tools, check all results carefully for errors or fabrications. (See “How to curb hallucinations in Copilot” for tips on minimizing such errors.)
You can refine the generated result by entering a follow-up prompt in the chat box.
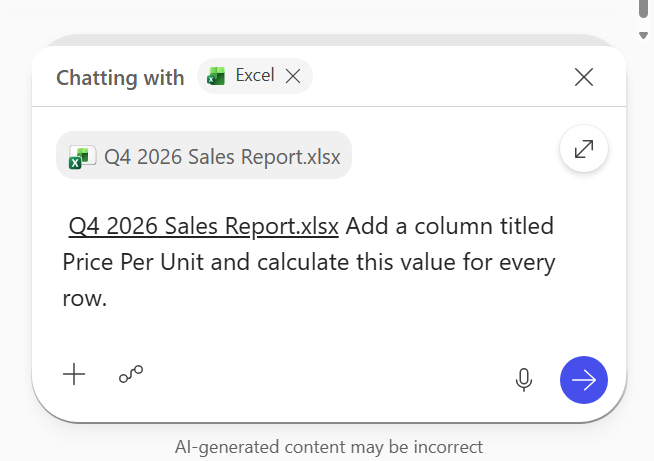
To refine a generated Excel spreadsheet or PowerPoint presentation, you have to first attach it to the chat box: Type the forward slash (“/”) in the chat box. This will pull up a list of files recently added to your OneDrive, including the generated spreadsheet or presentation. Select it and then enter your prompt to refine it.
To refine a generated Excel spreadsheet, attach the file and say how you want it changed.
Copilot will generate a revised version. This will be saved as a new file in the Documents folder in your OneDrive.
It’s best to think of genAI output as a template or first draft that you will update, add to, and otherwise tailor for your own needs. To do so, it’s easiest to open the generated file in the appropriate M365 app.
At the upper right, click Open in Word, Open in Excel, or Open in PowerPoint to launch the web version of that app in a new browser tab. The generated document, spreadsheet, or presentation will appear inside the app so you can do further work on it.
You can use Copilot Chat to analyze your M365 documents in various ways by invoking the Analyst agent. This agent is available only if you have a Microsoft 365 Premium plan or, in a business environment, if you have an add-on M365 Copilot license. (That said, there is a workaround for the third tip below for those who don’t have an advanced license.)
In the left sidebar, select Analyst in the Agents list. (If you don’t see it, follow the instructions in step 1 above to add it.) Or, inside the Copilot chat box, type @analyst and press the Enter key.
Next, attach the file or files that you want Copilot to analyze. Click the + icon on the chat box and select Add content (to attach a file in your OneDrive) or Upload files (to attach a file that’s on your local PC drive).
Call up the Analyst agent and upload the files you want it to analyze.
Here are a few ways you can have Copilot analyze your files:
Using the Analyst agent, Copilot can act as a data analyst, spotting patterns and anomalies in your Excel or PowerPoint files. It can also identify missing data that would provide a more complete picture.
Tip: For the most accurate results, describe a specific source (such as the name of a table or slide numbers) and the timeframe to give the agent boundaries for its analysis.
Copilot Chat’s Analyst agent can surface key themes in a PowerPoint presentation.
If your source file is missing the data Copilot needs for the trend analysis you’ve asked for, it will tell you so. It may instead provide a summary of the data the file does include and/or what can be inferred from the file’s data.
Copilot correctly says it can’t provide the requested analysis from the source data.
The Analyst agent can use statistical models to project future values based on historical data in an Excel file. (These are simple projections and should not be presented as official forecasts.) Your source spreadsheet must include a time-based column, such as dates, and a numerical column for the values you want Copilot to forecast.
Copilot has projected January sales based on the average growth rate from October to December.
You can also prompt the Analyst agent to create a projection based on an Excel spreadsheet and output it on a PowerPoint slide that you can download. Example:
The agent explains how it calculated the forecast and offers suggestions for tweaking the result. Type whatever changes you want to make into the chat box, and Copilot will generate a new version of the slide.
Documents often go through multiple revisions, especially in a collaborative work environment. Unlike a basic versioning feature that lists literal differences, Copilot can provide contextual understanding and explain why a change is significant.
After you’ve attached two files to the chat box, enter a prompt, such as:
The Analyst agent summarizes the changes in the document’s overall direction and details the main differences in specific aspects of the document.
The Analyst agent explains how a document has changed overall, then cites key differences in areas such as title and positioning.
Note: If you don’t have access to the Analyst agent, you can alternatively try using the Word agent or the main Copilot Chat interface to compare two document versions. Like the Analyst agent, Copilot Chat presents its results in the chat window. If you use the Word agent, it creates a detailed comparison document after asking a series of questions about purpose, audience, and style.
When working on a project with your co-workers, it can be a challenge to keep up with who did what to a file. You can prompt Copilot to list edits and comments to a file. This allows you to catch up on the context of changes without having to open it.
You don’t need to invoke the Analyst agent to do this. This works better if you use the main Copilot Chat. Click the + icon to attach the file (document, spreadsheet, presentation).
Optionally: At the upper-right corner, click Auto, which will open a dropdown. Here you can select an AI model that gives you results faster, or one that spends more time “thinking” in order to give you better-quality results. A second dropdown at the bottom lets you select a specific AI model by name, such as GPT-5.3 or GPT-5.4. We recommend picking a “think deeper” model for insights retrieval.
You can optionally pick a model for Copilot to use when it generates results.
Copilot will generate a detailed response based on your prompt.